Tag Archives: heated driveway installation

Anticipate Your Customers’ Questions

ProLine supports contractors and the demands that come with running a profitable business. Trying to enhance and expand offerings during the winter season can be a tricky task, but ProLine may be able to help. Snow melting systems are wise investments for home and business owners. Knowing that driveways, walkways, or high-traffic areas will be cleared of snow each morning after a storm provides peace of mind. ProLine offers peace of mind for builders with advanced products and high-quality services to ensure that each system installation goes off without a hitch. ProLine knows that anticipating your customers’ questions is important. Having answers to customer questions assuages fears while providing top-notch service. Here are a few commonly asked questions contractors may encounter when working with homeowners.

How do heated driveways work?

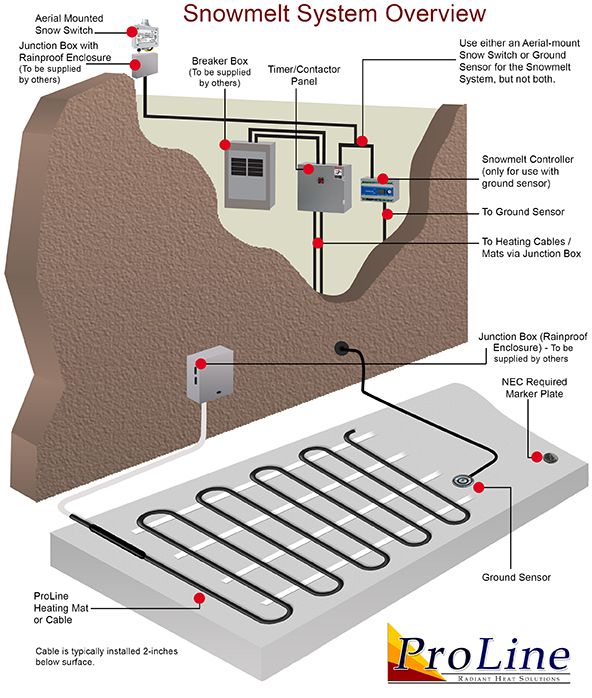
Heated driveways are fully automated and efficiently provide heat by activating only when weather conditions warrant. When an activation device (pavement-mounted snow sensor or aerial-mount sensor) detects precipitation and the temperature is below the set point, it will signal the system controller. The controller then sends power to the radiant heat cable, and the driveway will begin to heat. The heated area will prevent snow from accumulating. After the storm, the system remains on for a short time to dry the area, thus preventing slick black ice from forming.

What are my options? 

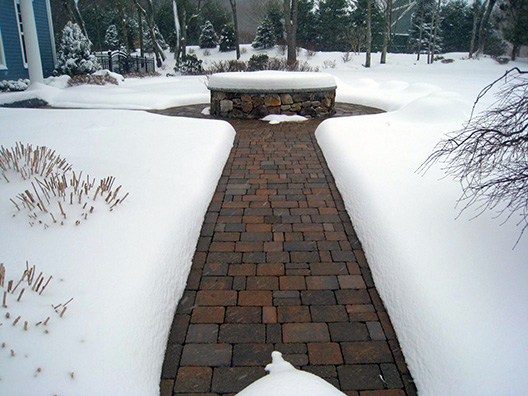
The options are endless when designing the layout of a ProLine snow melting system. ProLine offers multiple trusted radiant snow melting solutions. Customization is easy for homeowners with options to combine products to suit any need. ProLine’s rugged heating cable is one of the most versatile products on the market. ProLine’s snow melting cable can handle heating any medium, from pavers to concrete and even hot asphalt. With individual system configuration, a snow melting system is available for any area, no matter the shape or size. Heating porches, steps, walkways, or driveways is simple and easy. If the budget is limited, heating specific areas is also a popular option. Heating an 8-10 foot strip in the middle of a driveway, tire tracks, high traffic areas, inclines, or even a strip in the middle of a sidewalk are great ways to utilize radiant heat. Businesses can heat storefront walkways, loading docks, or ramps to keep workers safe during winter storms. ProLine’s flexible products and professional designers allow any customer to enjoy the benefits of radiant heat.

What are the power requirements? 

For most snow melting systems, one 30-amp breaker provides enough power to heat a 170 square-foot area. That means to heat a 350 square-foot driveway, two 30-amp breakers, or one 60-amp breaker will be needed. Most homes have either a 100-amp or 200-amp breaker panel, which should be sufficient. ProLine always recommends having a qualified electrician check to make sure the home has insufficient power. To ensure the system’s warranty remains valid, a qualified electrician must also wire the snow melting system.

Installing radiant heat cable in mats
Laying out the heating cable (mats) for a heated driveway installation.

For homes with limited power, ProLine design professionals can use a technique called zoning. Zoning divides the heated area into separate zones. Available power is optimized by heating each zone individually. ProLine also offers an industry-leading sequencer that “bounces” power from zone to zone instead of heating zones one after another. This technique allows a larger area to be heated almost simultaneously with only a slight increase in melting time.

Is installation difficult? 

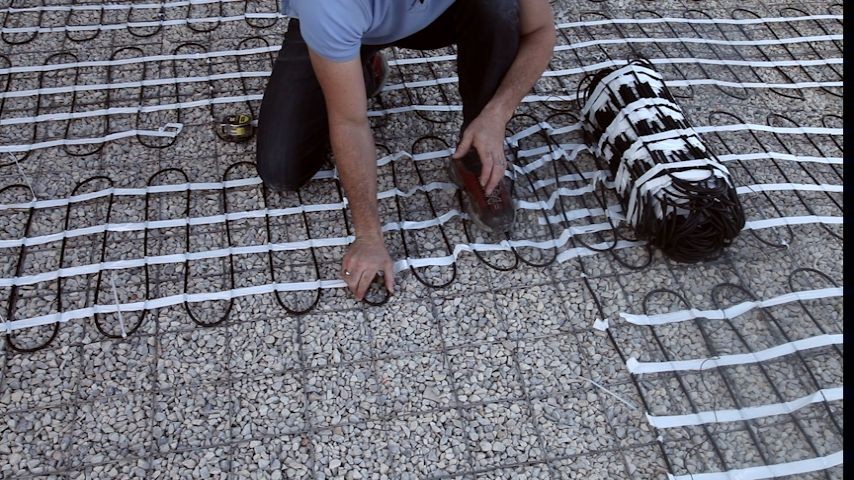
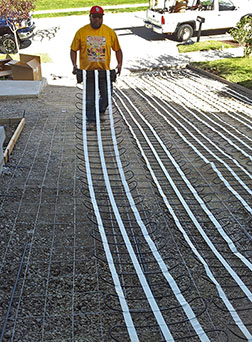
Snow melting systems are not difficult to install – especially with ProLine Radiant’s superior customer support services. Proper installation of all components is stress-free with ProLine’s free installation training and installation support. Experts are available to help at any point during the process. However, there are a few basic guidelines to follow for every installation.

  1. Never cut or alter the heating element. While the mat backing can be cut to make turns, never cut the actual heating cable. Utilize extra cable by adjusting spacing (minimum spacing is 2-inches) or routing cable around the perimeter within the heated area. (Always maintain proper cable spacing.)
  2. Heat cables should never touch. Touching cables will cause burnout due to excessive heat. (Minimum cable spacing is 2-inches.)
  3. Cable or mats should never cross or pass through an expansion joint. Heat cable must be ¾ to 1-inch from the bottom of the control joint.
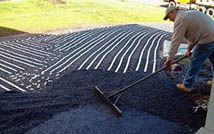
  4. Be extra cautious when working around the heating cable. Tools such as rakes, trowels, or shovels can damage the cable’s outer jacket. While the cable is durable, excessive walking on the cable should be avoided when possible.
  5. When working with concrete, attach the cable to remesh with zip-ties or cable strapping. This step prevents the cable from being pushed down by the weight of the concrete pour.

What are the operating costs? 

ProLine’s snow melting systems are designed specifically for the average temperature and snowfall of their location (according to ASHRAE standards). This assures optimum performance and cost efficiency. If a customer is looking for an approximation of the operating costs, use this formula.

  1. Determine the square footage of the area to be heated.
  2. Multiply the square footage by the heat required (usually 31 watts per square-foot for residential areas). This number is total watts per square-foot.
  3. Divide this number by 1,000 to convert to kilowatts.
  4. Look up the kilowatt-per-hour rate from the local utility company.
  5. Multiply the kilowatts-per-square-foot number by the kilowatts-per-hour rate from the utility company. This number will be the approximate cost.

Keep in mind that snow melting system operating costs during a storm are typically lower than those associated with hiring a professional snow removal service. Snow melting systems can also extend the life of driveways by avoiding abrasive snow removal and chemicals. No chemicals also mean snow melting systems are environmentally friendly.

What support does ProLine Offer?

Unmatched customer support separates ProLine from competitors and ensures every system meets the need of any customer. Professional design services include a comprehensive AutoCAD® with layout, power requirements, performance expectations, and all information needed before installation. Installation training is also available online via video conference or in person. Instructors are professionals who will work closely with you to make sure all your questions get answered. You will feel confident and have all the knowledge needed for your specific installation. ProLine’s combination of high-quality products and superior customer service make it the easy choice for any contractor.

If you have questions about snow melting systems for your business, speak with a ProLine professional today at 866-676-9276.

How to Avoid Common Heated Driveway Installation Mistakes

Take Advantage of ProLine’s Customer Services

Radiant snow melting systems offer a clean, efficient way to keep driveways, sidewalks, steps, ramps, and more free of snow and ice during the cold winter months. These automated systems are designed to operate only when needed. The systems utilize advanced sensors that detect temperature and precipitation, so when weather conditions warrant, the system turns on. The driveway (or other surface) is then warmed to prevent snow accumulation. An “after-run” function keeps the system on for a short time after the snowstorm to dry the area and prevent slick sheets of ice from forming.

Installing these systems is relatively simple; however, there are still some common mistakes made by installers. Most of these mistakes can be avoided by taking advantage of ProLine’s free training and installation support services. There are also several other steps you can take to avoid common blunders and ensure a timely, proper installation so that your radiant heating system meets all your expectations.

Steps to Ensure a Proper Installation

The Number One Way to Limit (or eliminate) Mistakes is to Take Advantage of ProLine’s Industry Leading Support Services

One of the biggest mistakes that installers make is not taking the free installation training course. ProLine training features an experienced instructor who will cover all the aspects of your installation, so you can proceed with confidence. This is the best way to gain an understanding of the basics of installing automated snow melting systems, and can help you avoid making mistakes. The courses are available online via web conference and are typically completed in less than an hour. However, you can stop at any time during the training and ask your instructor questions about your installation.

Heated paver sidewalk

Unlike other wholesale providers, ProLine also provides professional system design and layout services (in addition to the free training). This detailed layout of the system serves as a road map for installers. Referring to this throughout the installation will certainly help to limit installation mistakes. The system design includes the precise layout and materials of the system as well as the proper load calculations, breaker sizes, number of breakers, and so on.

ProLine’s radiant heat products and system components are second to none; however, even the best components cannot overcome improper installation techniques. Take advantage of the free training, system design, and other support services offered by ProLine. ProLine’s tech support staff is the best in the business, and we stand ready to assist you at any time during the installation. For more information, call ProLine today at 866-676-9276.

Avoid Making These Common Installation Mistakes

Proper Spacing: Maintain proper cable spacing and never allow the heat cable to cross or touch. Unfortunately, violating this “spacing rule” is all too common. The minimum cable spacing is 2-inches. If the cables are closer than 2-inches this can cause it to overheat and fail.

Never cut the cable: To make turns with the mats, cut the tape backing and turn the mat accordingly.

Periodically Test the Heat Cable During the Installation. Follow the instructions in the installation manual and conduct OHM tests of the cable before and throughout the installation process. Write the results on the warranty card provided. (This helps to ensure that your warranty remains valid.)

Check Your Components Upon Receipt: Prior to Beginning the Installation, check to make sure you received all the correct components and heat cable. Prior to applying the concrete, asphalt or pavers, lay your heat cable out in the area to be heated to ensure that you have the right amount of cable. Also, in concrete applications, always secure the heat cable to the remesh at regular intervals. Use Mesh-Ups® support chairs to keep the remesh from resting on the ground during the pour.

Embed the Splice and 6-inches of the Power Lead: Make sure the splice and at least 6 inches of the power lead is embedded in the paved surface.

Install the Snow Sensor in a Proper Location: Never mount the sensor next to a wall or someplace where it is not exposed to the weather. Install your aerial-mount sensor above the roof line. The system’s activation device must have an unobstructed 360 degree view of the sky to properly detect falling snow. Any nearby obstructions can prevent snow from falling onto the sensor, delaying or preventing it from triggering the system.

Never run Heat Cable (or mats) Through an Expansion Joint: All heating cable should be isolated to a single pour area.

Use the Proper Equipment: Avoid using sharp metal trowels and shovels when tamping or spreading the concrete over the radiant heating cable. Be very careful to avoid damaging the snow melting cable.

Use Supports to Prevent the Heat Cable from Resting on the Ground During the Concrete Pour: Heat cable should be elevated so that it remains within about 2-inches of the completed driveway surface. Small plastic Mesh-Ups® support chairs can be fastened to the remesh to provide support and prevent the heat cable from being pushed to the ground.

To learn more about radiant heat, or our support services, call ProLine today at 866-676-9276 today.

How is a Heated Driveway Installed?

Tips for Installing a Radiant Snow Melting System

Radiant driveway heating systems can be installed in a variety of applications, including concrete, asphalt, or under pavers. While ProLine Radiant offers industry leading products and preeminent customer service, perhaps the most important thing to remember is that a radiant snow melting system is only as good as its installation. For this reason, ProLine emphasizes its free installation training and personal installation support services. These services help to ensure a successful installation and satisfied customers. But just how are heated driveway systems installed?

Snow melting system and components overview.

Click on image to enlarge the illustration.

After receiving the heat cable and system components, verify the shipment and make sure all the correct materials have been received. Next, prepare the area where the system is being installed by making sure there are no nails, sharp rocks or other items present that can damage the heating cable.

For concrete heated driveways, install wire remesh over the area that will be heated. After laying out the remesh, place the heat cable over the remesh and use zip ties to secure it to the remesh. This keeps the cable from shifting during the concrete pour. Then place plastic Mesh-Up supports under the remesh (the remesh “clicks” into the slots cut out in the top of the Mesh-Up) to prevent the heat cable from resting on the ground. (The heat cable should be about two inches from the finished surface.)

Heated paver sidewalk

Use a Megger to repeatedly check the heat cable during the installation. Do this again, just prior to pouring the concrete. If the readings look good, begin pouring the concrete over the heating cable/mats. Be very careful when using shovels and rakes during this process. These metal tools can damage the heat cable, so care must be taken.

A typical concrete slab is 4-inches thick. Follow your concrete contractor’s installation methods and adhere to all building codes. (Again, the heating cable should be approximately 2-inches from the finished surface.)

Most automated driveway heating systems utilize an aerial mount snow sensor to activate the system. This is typically installed at the roof’s edge where it has open access to the elements. When precipitation is present and the temperature is below the adjustable set point (usually set at 39°F), the sensor signals the contactor panel and power is then sent to the heat cable.

For more installation tips, view our online resource of instructional “how to” videos.

pl-sm-Heating_Cable_Tips-Condensing_Cable_Spacing thumbnail

Important Note: For warranty and safety purposes, it is necessary for a qualified electrician to connect the system.

Contact ProLine for more information at 866.676.9276.

Successfully Installing Radiant Snowmelt Systems

Tips for Proper Installation of Heated Driveways and Walks

A radiant heated driveway is only as good as its installation, which is why it’s important to carefully follow best practices when installing radiant heat. Follow a few simple tips and your snow melting system will be up and running in no time, working as it was designed to do.

For starters, before you lay down a foot of heat cable, it’s important to make sure you have the right products for your installation. Prior to any installation, check the voltage and the wattage of the heating cable (typically indicated on the box). If you’re unsure, you can always contact ProLine Radiant for confirmation and/or recommendations. We offer free installation support to help ensure that the installation process goes smoothly and properly.

Installing radiant heat cable in mats
Laying out the heating cable (mats) for a heated driveway installation.

A key practice to ensure the successful installation of a radiant snow melting system is to use a megohmmeter to perform OHM tests of the heat cable before removal from the box, during, and after the installation. This allows you to discover any potential problems as early as possible, saving you time and headaches, as well as ensure successful installation. Always document the results to maintain the manufacturer’s warranty.

Here are a few rules to remember as you begin the installation of your system:

Never cut, cross or overlap the heating cable. Heat cable should not be altered under any circumstances, as it may cause overheating, resulting in damage to the cable.
Always embed the cable completely. Leave no air around the cable.
Make sure to embed the factory splice (where the heating cable and power lead meet).
Using a megohmmeter, perform OHM tests of the heat cable before removing the cable from the box, during the installation, and after the cable has been laid out.
Always run the cold lead in conduit (power lead for the heating cable) – it is not direct burial.

For asphalt applications, snow melting cables are normally covered by two inches of asphalt. To prevent heat damage, the asphalt should be allowed to cool to 220°F (105°C) before pouring directly onto the mats or cables. Ground sensors/tubes should not be exposed to temperatures above 176°F (80°C).

And, for a proper sensor installation, both ground and aerial activation devices require a clear, 360-degree “view” of the sky to allow snow to fall onto the sensor plate. If drifting is an issue where the snowmelt system is being installed, it’s best to install a ground sensor.

Of course, you should always read the Installation Manual and follow instructions. You can always call ProLine Radiant at 866.676.9276 or visit us online for more information or installation support. At ProLine, we work with contractors and professional builders to provide customers with the best custom snow melting system solution at the best price possible.


Options and Tips for Installing Asphalt Heated Driveways

When it comes to installing a radiant heated driveway, installing a system in asphalt is one of the easiest applications available. The systems are not only easy to install in asphalt, but provide stellar performance, making asphalt heated driveways a popular choice among homeowners and business owners. Asphalt radiant heated driveways feature energy efficient, maintenance-free operation that enhances safety by keeping driveways clear of snow and ice 24/7. And radiant heat can be easily installed in new construction, asphalt refresh or even in existing driveways. Asphalt driveways offer great flexibility when it comes to adding or installing a radiant snow melting system. So regardless where you are in your plans, there’s still time to include a radiant heated asphalt driveway.

Asphalt and radiant snow melting systems go together for several reasons. They are both durable, and engineered to withstand extreme temperatures. They also adapt easily to the environment. Asphalt pavements flex and “give” with significant settlements of frost heave, while ProLine automated snow melting systems respond to the weather, operating only when conditions indicate that snow is on the way.

Retrofitting an asphalt driveway with radiant heat.

ProLine heat cable is specifically designed to withstand the hot temperatures of new asphalt construction jobs. And in keeping with ProLine’s commitment to always offer the latest technology and the best, most proven products, ProLine has taken its industry leading cable and added even more outstanding performance features. We listened to the comments and suggestions we received from you and other construction professionals during our FREE installation training courses to make your requests and made them a reality. This means our industry leading snow melting cable has now been enhanced to offer even more robust features, including the ability to install in much hotter asphalt temperatures, easier installation during cold weather conditions, an even tougher outer sheath and much more. Contact a ProLine representative to learn more about these latest advancements.

You see, at ProLine we are never content to be among the leaders. We might not achieve perfection, but we’ll never stop trying. We work tirelessly to research, test and develop the absolute best products possible to ensure that your business succeeds. And we can’t do that without your feedback and working closely with you during the installation process.

To install radiant heat in a new asphalt driveway, the cable is laid out on the binder or base coat and then hand shovel approximately 2-inches of asphalt directly over the cable. The asphalt is then compacted, using a 1-ton roller or less. Installing a heated asphalt driveway is relatively quick and easy. But remember, a snow melting system is only as good as its installation, so be sure to follow instructions and best practices, and don’t hesitate to take advantage of ProLine’s free installation support services. The fully automated heated driveway (or sidewalk) will provide a discreet, reliable and maintenance free operation to keep your walks and driveway snow and ice free.

If you’ve already got an asphalt driveway, but it’s in sore need of repair, placing an overlay on the existing surface can be easily accomplished. As with the new pour, ProLine snow melting cable can be installed just before the overlay. After a quick patch, apply asphalt as described above and compact. NOTE: Be sure to have a qualified electrician perform the electrical work. And follow the instructions in in the manual so ensure you keep your warranty valid.

Existing asphalt driveways can also be retrofitted with radiant heat. Using saw-cut technology, grooves are cut into the existing asphalt, and the heat cable is then placed in the freshly cut grooves. An epoxy topcoat is then applied as a sealant over the newly embedded cable. For additional traction and safety, a sand broadcast can be applied to the surface before the epoxy.

Fitted with a ProLine snow melting systems in asphalt provide a cost-effective option for your home, and will last for years with virtually no maintenance. Just think of the money you’ll save on snow removal services, snow melting chemicals and gas for your snow blower. And of course, there’s the gift of time. While your neighbors are out shoveling, snow blowing or tapping their watches waiting on their snow removal service, you’ll be in your car and on your way.

To learn more about the about the benefits of a radiant heated asphalt driveway or many radiant heat options available; or to receive a free quote, call ProLine Radiant today, at 866.676.9276.