Data Sheet for the EcoTrace Sequencing Panel

Download the ProLine Snow Melting Sequencer Panel Data Sheet (PDF)

Download the ProLine Snow Melting Sequencer Panel Data Sheet (PDF)

Download the ProLine Snow Melting System and Components Technical Guide (PDF)

Download the Snow Melting System Customer Inquiry Guide (PDF)

Download the ProLine Radiant Heat Services Brochure (PDF)

Download the ProLine Snow Melting Mats and Cable Data Sheet (PDF)
Radiant driveway heating systems can be installed in a variety of applications, including concrete, asphalt, or under pavers. While ProLine Radiant offers industry leading products and preeminent customer service, perhaps the most important thing to remember is that a radiant snow melting system is only as good as its installation. For this reason, ProLine emphasizes its free installation training and personal installation support services. These services help to ensure a successful installation and satisfied customers. But just how are heated driveway systems installed?
Click on image to enlarge the illustration.
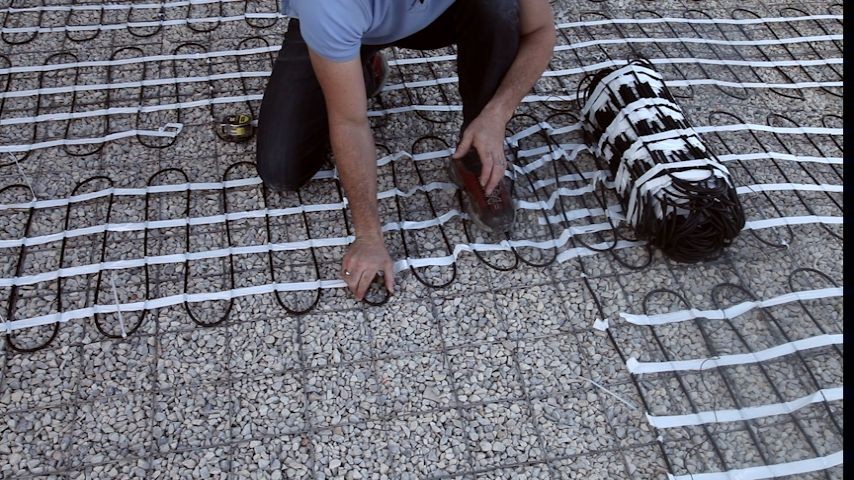
After receiving the heat cable and system components, verify the shipment and make sure all the correct materials have been received. Next, prepare the area where the system is being installed by making sure there are no nails, sharp rocks or other items present that can damage the heating cable.
For concrete heated driveways, install wire remesh over the area that will be heated. After laying out the remesh, place the heat cable over the remesh and use zip ties to secure it to the remesh. This keeps the cable from shifting during the concrete pour. Then place plastic Mesh-Up supports under the remesh (the remesh “clicks” into the slots cut out in the top of the Mesh-Up) to prevent the heat cable from resting on the ground. (The heat cable should be about two inches from the finished surface.)
Use a Megger to repeatedly check the heat cable during the installation. Do this again, just prior to pouring the concrete. If the readings look good, begin pouring the concrete over the heating cable/mats. Be very careful when using shovels and rakes during this process. These metal tools can damage the heat cable, so care must be taken.
A typical concrete slab is 4-inches thick. Follow your concrete contractor’s installation methods and adhere to all building codes. (Again, the heating cable should be approximately 2-inches from the finished surface.)
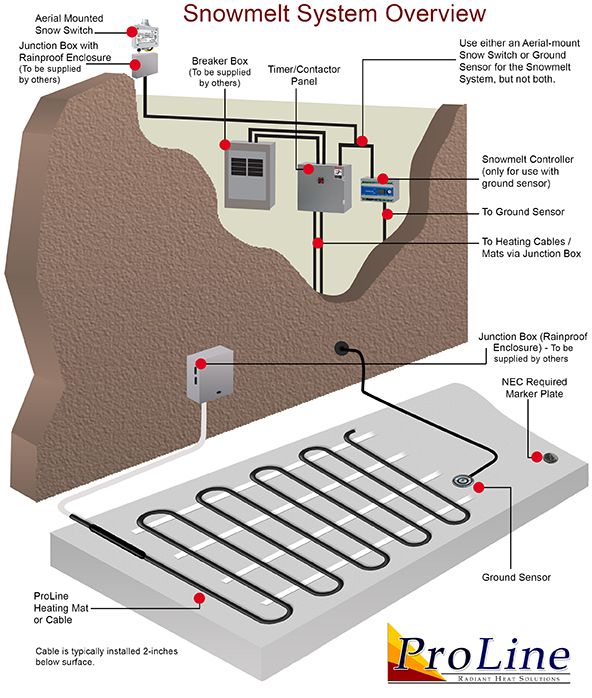
Most automated driveway heating systems utilize an aerial mount snow sensor to activate the system. This is typically installed at the roof’s edge where it has open access to the elements. When precipitation is present and the temperature is below the adjustable set point (usually set at 39°F), the sensor signals the contactor panel and power is then sent to the heat cable.
For more installation tips, view our online resource of instructional “how to” videos.
Important Note: For warranty and safety purposes, it is necessary for a qualified electrician to connect the system.
Contact ProLine for more information at 866.676.9276.