Ensuring Successful Installation of a Radiant Heat Snow Melting System
Installing a radiant heat snow melting system is not particularly difficult. While choosing top quality components is one way to ensure optimum performance, the most important aspect is making sure the system is installed correctly. Even the best heating cable, controllers and snow sensors cannot perform as intended if the system is not installed properly. This includes everything from proper cable spacing to the proper placement of the sensor(s).
Because the proper installation of a heated driveway or roof deicing system is crucial, ProLine Radiant includes free installation training and technical support with each system. This way, customers are not only assured of receiving proven, industry leading products, but they also receive the support and knowhow of experts for installing the system correctly.
The training is conveniently available online or in person at our corporate headquarters. Free training at rep locations throughout the country is also available. Installers may also set up special training sessions at their convenience. ProLine instructors will cover all the necessary topics and answer any questions you may have to give you the knowledge and confidence necessary to install interior and exterior radiant heat systems. These courses will help to ensure that the system performs as expected and your customers are satisfied. Contact ProLine to learn more about our free training services at 866.676.9276.
To further ensure proper installation, ProLine also provides complete system layout and design services. The professional design includes the proper layout and materials, load calculations, breaker sizes, and number of breakers, etc. ProLine’s detailed system designs ultimately save time and money. And its industry leading customer services provide contractors with the support they need to confidently install radiant heat.
ProLine also has an extensive collection of installation videos online. Visit the website to view ProLine’s instructional radiant heat videos.
Snow Melting System Installation Options
Heat tire tracks: Save money by heating two 24-inch wide heated tire tracks rather than heating an entire driveway.
Heating the Center Strip of High Traffic Areas: Heat only an 8-foot wide strip up the middle of the driveway. Instead of heating an entire sidewalk, just warm a 3-foot wide strip in the middle of your sidewalk.
Heat specific/custom areas: Heat the sloped or shaded areas of a sidewalk, or just the steps. Heat dog runs or kennels to keep outdoor pets comfortable, or only heat the.
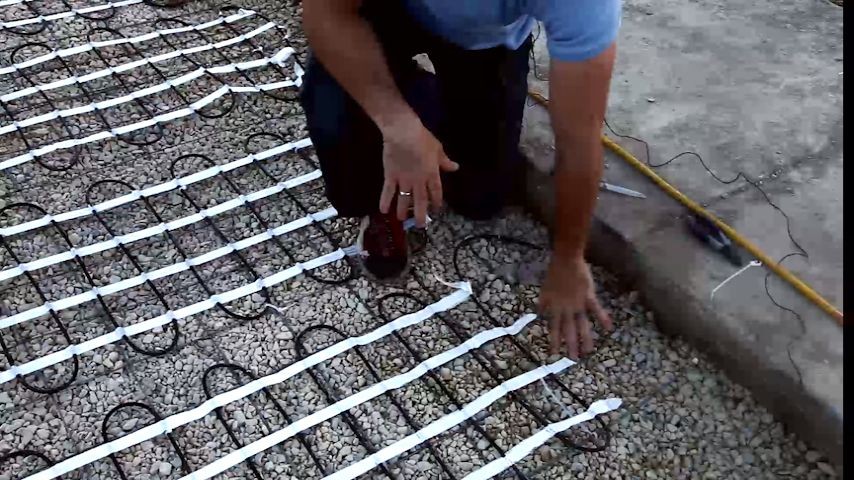
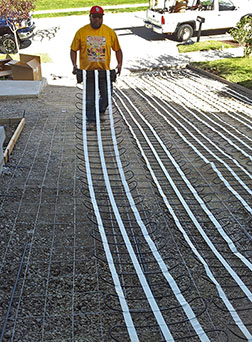
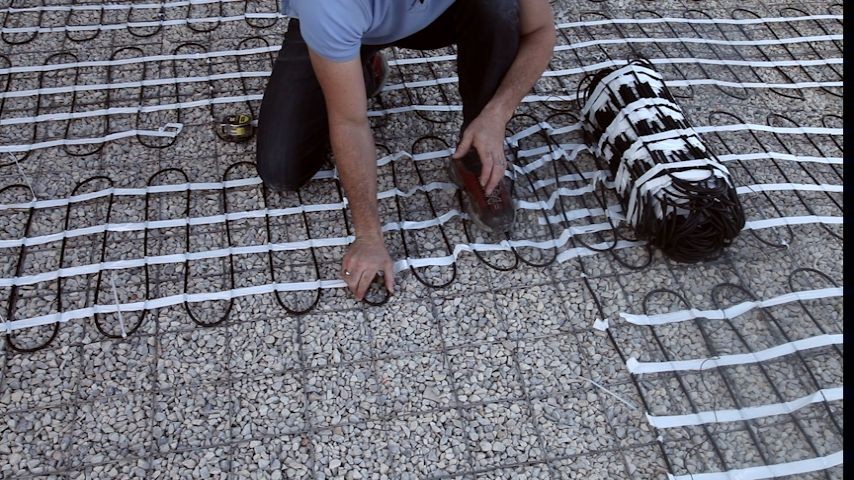
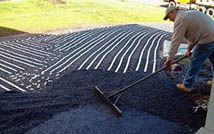
Laying out the heating cable (mats) for a heated driveway installation.
Basic Heat Cable Installation Tips
Be sure to measure the ohm reading of the cable at different times during the installation and record the results in the space provided on the warranty card.
In concrete and asphalt applications, the heating cable should be 2 inches from the finished surface. (The heating cable should never be resting on the ground prior to the pour.)
Always maintain proper cable spacing. (Cables must be spaced no closer than 2 inches apart (center-to-center) and no more than 4 inches, center to center. (Minimum spacing: 2 inches. Maximum cable spacing: 4 inches.)
Never allow the cables to cross or touch each other.
Do not cut the heat cable. (Adjust cable spacing accordingly if you have extra cable.)
Avoid excessive bending, kinking, or stressing of the cable. Doing so can cause the insulation to “bubble” and pull away from the cable.
Contact ProLine Radiant today at 866.676.9276 to sign up for your installation training course. You’ll find that working with ProLine offers peace of mind, knowing that you’ll have a partner – from beginning to end – for each of your radiant heat projects.
Radiant driveway heating systems can be installed in a variety of applications, including concrete, asphalt, or under pavers. While ProLine Radiant offers industry leading products and preeminent customer service, perhaps the most important thing to remember is that a radiant snow melting system is only as good as its installation. For this reason, ProLine emphasizes its free installation training and personal installation support services. These services help to ensure a successful installation and satisfied customers. But just how are heated driveway systems installed?
After receiving the heat cable and system components, verify the shipment and make sure all the correct materials have been received. Next, prepare the area where the system is being installed by making sure there are no nails, sharp rocks or other items present that can damage the heating cable.
For concrete heated driveways, install wire remesh over the area that will be heated. After laying out the remesh, place the heat cable over the remesh and use zip ties to secure it to the remesh. This keeps the cable from shifting during the concrete pour. Then place plastic Mesh-Up supports under the remesh (the remesh “clicks” into the slots cut out in the top of the Mesh-Up) to prevent the heat cable from resting on the ground. (The heat cable should be about two inches from the finished surface.)
Use a Megger to repeatedly check the heat cable during the installation. Do this again, just prior to pouring the concrete. If the readings look good, begin pouring the concrete over the heating cable/mats. Be very careful when using shovels and rakes during this process. These metal tools can damage the heat cable, so care must be taken.
A typical concrete slab is 4-inches thick. Follow your concrete contractor’s installation methods and adhere to all building codes. (Again, the heating cable should be approximately 2-inches from the finished surface.)
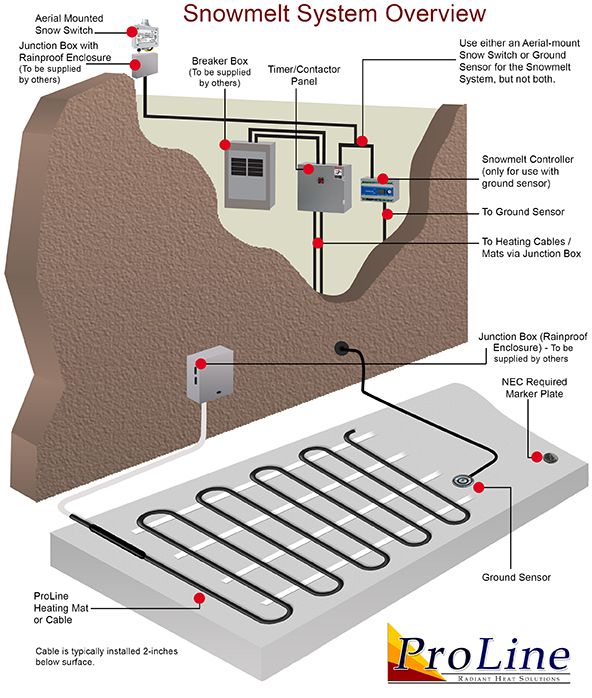
Most automated driveway heating systems utilize an aerial mount snow sensor to activate the system. This is typically installed at the roof’s edge where it has open access to the elements. When precipitation is present and the temperature is below the adjustable set point (usually set at 39°F), the sensor signals the contactor panel and power is then sent to the heat cable.
For more installation tips, view our online resource of instructional “how to” videos.
Important Note: For warranty and safety purposes, it is necessary for a qualified electrician to connect the system.
Contact ProLine for more information at 866.676.9276.
While many contractors have not installed or worked with radiant heat systems, those who have installed these systems have discovered the relative ease of installation and improvement to their bottom line. And whether you’re installing a heated driveway, heated floors or a roof deicing system, these advanced systems can be easily customized to meet the specific needs of your project. And radiant snow melting heat cables can be installed in just about any medium, including concrete, hot asphalt, or under pavers.
Because of their versatility, radiant snow melting systems are not only ideal for new construction projects, but also for increasing the comfort, convenience and value of existing homes. ProLine can design systems that best meet the unique demands of your clients, whether it’s a retrofit or new construction application.
ProLine snow melting systems are designed for use in a wide variety of mediums and applications, including concrete, asphalt and pavers. The snowmelt systems can be installed to accommodate budgets as well as custom layouts. Snow melting systems can be used to heat entire driveways, tire track layouts, steps, ramps, sidewalks or porches, etc.
Installing Radiant Heat in Asphalt
One of the most popular, affordable, and easy to install mediums for radiant heat is asphalt. Where asphalt gives and flexes according to a wide-range of seasonal temperature changes, the durable, specially designed ProLine heat cable ensures consistent performance to effectively keep driveways clear of snow and ice. The automated systems also feature manual override capability to deal with snow drifts of areas where water may have pooled and refrozen.
The cable’s external jacket is designed specifically for installation in hot asphalt applications, so ProLine’s asphalt heat cable is rated up to 460 degrees for up to 10 minutes. (For additional technical specs and installation information, please refer to the Snow Melting Cable and Mats Data Sheet or Installation Manual.)
ProLine snow melting heat cable is available off the spool or pre-spaced in mats. The mats can be rolled out for quick and easy placement over the area to be heated. Cable off the spool allows greater flexibility for custom shapes and hard-to-reach areas of snow melting systems. In the case of a retrofitting an asphalt driveway with radiant heat, the cable is simply laid out over the existing asphalt and then asphalt is applied over the cable. A compacted layer of 2 inches is recommended. For detailed installation and compacting instructions, please refer to the installation manual.
In addition to offering industry leading heat cable and system components, ProLine also includes unparalleled customer services, including free installation training, installation support, system design and layout, and a wealth of instructional resources online, including “how to” videos. Whatever your goals, you’ll find a range of versatile, affordable radiant snow melting systems flexible enough to meet your goals.
A Few Helpful Installation Tips:
Heating cables should never touch, cross, overlap or get bunched up. Always allow 2 inches of spacing between each cable
For asphalt applications, check the maximum rated heat temperature of the heating cables before you apply hot asphalt and confirm that the asphalt does not exceed this temperature.
If you’re installing mats, but need to make individual runs of heat cable, simply cut the tape backing of the cable mats and then layout the cable accordingly. BUT DO NOT CUT THE HEAT CABLE.
Manually pour small quantities of asphalt on the heating cables and spread it evenly around and over the cables. Repeatedly applying small quantities of asphalt on the heating cables during installation helps to prevent any potential damage to the cable.
Always handle heating cables with care—especially when using tools such as shovels, rakes and wheel barrels to avoid damaging the cables. When using wheelbarrows to dump asphalt, lay down sheets of plywood over the cable to avoid damaging the cable’s outer jacket.
Using a Megger, repeatedly check the cable resistance during the various stages of the installation (as outlined in the installation manual).
A snow melting system is only as good as its installation; therefore, an understanding of the proper installation procedures and local laws, codes and regulations is vital. Call us toll-free at 866-676-9276 to learn more. Our professionals are always happy to answer any questions you may have.
What Separates ProLine Radiant from the Competition? Ask Our Customers:
To all potential ProLine customers,
I am a landscape designer, located on the seacoast of New Hampshire. We get plenty of snow in the winter, and I truly believe that heated driveways and walkways are the next big thing for our area, as in some of the more dense residential areas there is often no place to put the snow. However, before recommending radiant heat to my clients, I needed to try it and live with it myself.
This fall, we installed ProLine heating cables in our driveway. So far we have had two storms, one mainly snow, and the other rain and ice. The driveway performed beautifully. During the snow storm, it melted the snow effortlessly. We had forgotten to put it on automatic so it was off during the first part of the storm. After realizing this, we turned the system on, but not before a couple of inches had already fallen, but it still managed to make up for lost time.
During the ice storm, the driveway was DRY, while everything else was covered in a skin of ice. Great success! I’m not much of a snow lover, but I’m actually looking forward to the next storm!
Although I am thus far completely sold on the product, the purpose of this letter is really to rave about ProLine’s customer service and support. These days, good customer service is rare, and great customer service is almost nonexistent. ProLine’s service is in the “great” category. For a new customer, with limited experience in outdoor heating, their technical support was crucial. Having a video web chat with Jim and looking at the schematic of the job before we began was one of the reasons for the success of the project. But the step-by-step instruction was only a part of the support that ProLine provided. Throughout the process they were always in touch. Larry, the account manager, was always there to answer questions, even when he was on vacation!
Brandon visited the site twice to answer questions and offer support, and Jim was always on the other end of the phone to talk to my electrician when it was necessary. They seemed to anticipate our needs and fulfill them before we even knew what they were ourselves.
In my years as a homeowner and landscape designer I have dealt with all sorts of people on all sorts of projects, and the service and support that we experienced from ProLine was among the best. It was a breath of fresh air, and I look forward to hopefully doing a lot of business with them in the future.
– Wickie R., Owner of Drawing Room Ink
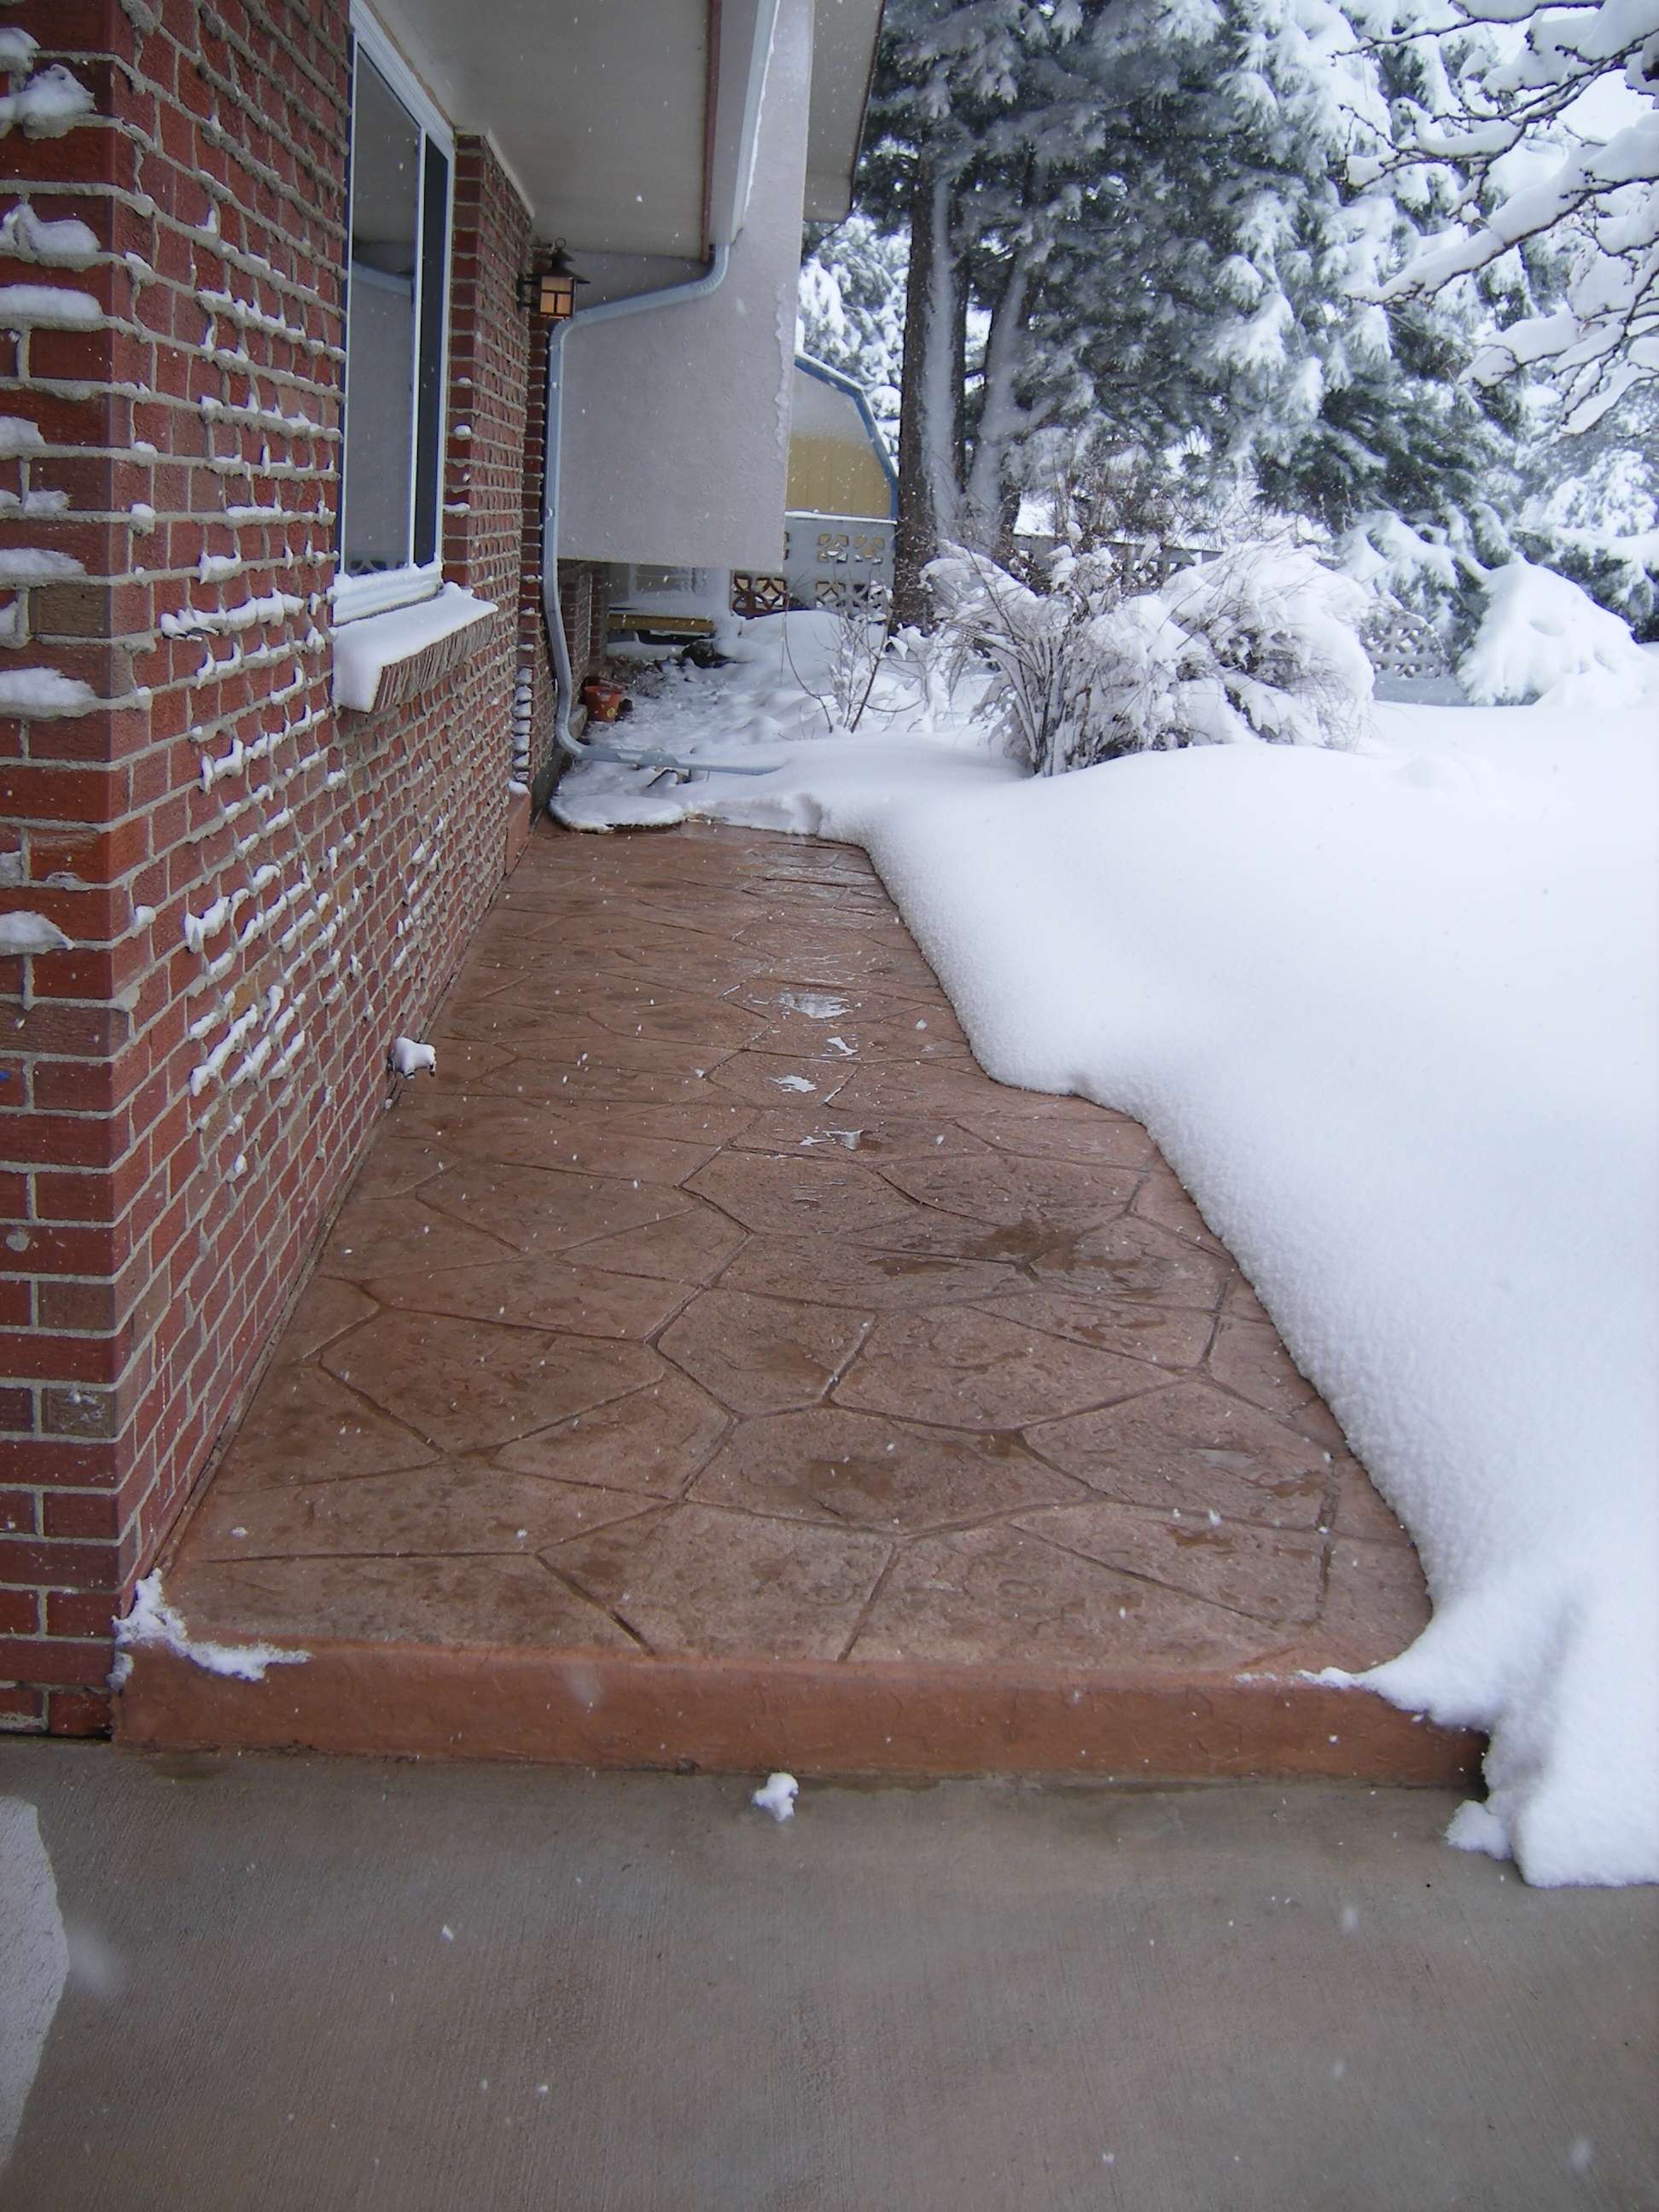
ProLine snow melting system installed to heat a paver driveway in New Hampshire.
Other Customer Comments
The first snow fall this winter was the test and the driveway has been ice/snow free all winter! The option to manually turn on the heat system has not been needed since the sensor works so well. My wife and I are very pleased with the results and feel much safer walking outside during the winter now!
– Dan, heated driveway owner
Thanks for supplying my customer with exactly what they needed. Living in multiple locations, the automated concrete heating system you provided was the perfect match for my customers in Idaho. Being new to this type of installation, I expected things to be a little more complicated. A few phone calls after receiving the product within days made the job simple to install. I would have to say that customer service with your company was by far second to none. I look forward to doing business with you in the future and referring you on to other homeowners with snow melting needs.
– Cody, Independent Contractor
Learn more about ProLine Radiant’s professional design/layout services and installation support, as well as ProLine’s free installation training by calling a ProLine radiant heat expert today at 866.676.9276.
Snow Melting Systems – Installation Tips
Premier Snowmelt Systems Backed by Unmatched Customer Service
Electric heated driveways continue to gain popularity among professional builders and homeowners alike as they discover the benefits of these maintenance-free snow melting systems. Featuring easy installation, reliable and energy efficient performance, electric snow melting systems offer environmentally friendly operation for clearing driveways, ramps, steps, parking lots and more of snow and ice.
ProLine Radiant’s fully automated snowmelt systems feature an advanced aerial-mount or in-ground snow sensor. When the sensor detects precipitation and the temperature is below the adjustable set point (typically set at 39°F), it sends a signal to the master controller that is usually installed on a wall in the garage. The controller then sends power to the embedded heat cable to warm the surface.
ProLine controllers for in-ground sensors are small (6×3½-inch), NEMA 1, wall-mount control panels that provide UL listed snow melting for large commercial and custom residential and applications. The controller also offers a feature allowing it to be controlled from an external signal (day/week timer, GSM-module or other signal source). The unit features a manual off/on switch (standby) so the heating system can be manually activated to melt snow or ice that occurs because of wind or shade, further enhancing safety.
For snow melting systems to perform as intended, they must be properly installed. Here are a few basic tips for the proper installation of radiant snow melting system heat cable.
Installing snow melting system heat cable and securing it to the remesh.
Heating Cable – General Installation Tips:
►
Maintain proper cable spacing. (Minimum spacing is 2 inches (center-to-center) and maximum cable spacing is 4 inches, center-to-center.)
►
Do not allow the heat cables to touch each other.
►
Never cut the heating cable.
►
Make sure the heating cable is not resting on the ground prior to a concrete or asphalt pour. Secure the cable to remesh that is supported by Mesh-Ups or something similar. The installed heating cable should be 2 inches from the finished surface.
►
In concrete applications, avoid running the heat cable through expansion joints. (The joint should be tooled or cut NO deeper than 1¼-inches, and the cable must be ¾ to 1-inch below the bottom of the joint.)
►
Do not strain the cable splice by pulling on the cable.
►
All of the cable must be embedded, including the entire splice and 6 inches of cold lead
►
Do not bend the cable sharply. This may cause the insulation to pull away from the cable and eventually cause the cable to fail.
►
When installing heat cable in paver applications, make certain that there is ½-inch of compacted paver sand or stone dust on top of the heating cables or mats. (Cables must be completely encased with no air gaps.)
Contact ProLine (866.676.9276) to learn more about our products and installation support, free training, and professional design and layout services.
Premier System Components, Support and Customer Service
ProLine snow melting systems are among the best in the industry. These fully automated systems are easy to customize to meet the individual snow melting and budget needs of your customers, and will provide efficient, maintenance free performance.
ProLine electric snowmelt systems can be utilized for a variety of radiant heating applications, including concrete, hot asphalt, pavers and more. These snow and ice melt systems are commonly used for a variety of residential and commercial snowmelt applications.
Residence with heated sidewalk and porch.
ProLine snowmelt heat cable is available pre-spaced in mats and on spools, making it a versatile, easy to customize and install for all types of custom snow melting projects. These fully automated electric heated driveways are activated by a high-tech snow sensor that detects moisture and temperature. When it detects precipitation and the temperature is below 39° Fahrenheit, the sensor signals the master controller. The controller then sends power to the embedded heat cable to warm the driveway, ramp or sidewalk. After the snow stops falling, the system remains on for a short time to dry the surface before shutting off automatically.
ProLine snowmelt systems are built from top quality materials and capable of performing under the harshest winter conditions. The convenient design, versatility and durable construction of ProLine electric radiant heat cable and mats make them a favorite among construction professionals throughout the country.
ProLine snow melting mats feature industry-leading heat cable that is pre-spaced in mats that can be easily rolled out during installation, simplifying and expediting the installation process while ensuring proper cable spacing for optimum performance. Unparalleled in performance and user-friendly design, ProLine snow melting heat cable (in mats or on spools) has proven to be one of the most reliable and easy-to-install radiant heating systems on the market.
Whether you plan on heating entire sidewalks, porches, driveways or small spaces, the ProLine radiant heating system can be tailored to meet the unique needs of most any snow and ice melting application. ProLine custom designs each system and includes personal installation support if you need to ensure your customers’ satisfaction – and your success. Contact a ProLine radiant heat expert today to see the options available.
Learn more about ProLine Radiant’s professional design/layout services and installation support, as well as ProLine’s free installation training by calling a ProLine radiant heat expert today at 866.676.9276.
ProLine Radiant Installation Tips
Important Guidelines for Preparing and Installing Radiant Snow and Ice Melting Systems
Although ProLine Radiant offers the industry’s premier radiant heat products and system components, it is important to remember that a radiant heat system is only as good as its installation. That’s why it’s so important to work with a radiant heat provider that offers complete radiant heat services, including professional system design and expert installation support services.
While many radiant heat providers claim to offer installation support, the fact is that most do not have a dedicated support staff of electrical and installation experts. Some unscrupulous businesses can be very persuasive to get consumers to buy, but after the purchase, the customer’s nightmare often begins. When you work with ProLine, you can count on having access to experienced pros to help you through the installation process.
Example of a radiant snow melting system warranty card.
Here are some important tips for installing radiant heat systems:
Record Resistance Values in Warranty Card – First and foremost, keep your warranty valid by following the installation instructions and using a megohmmeter to measure the cable readings before, during and after the installation process as outlined. (The megohmmeter is a special type of ohmmeter used to measure the electrical resistance of insulators.) Measuring the cable’s ohm reading during the installation process provides the required warranty information and can reveal if any cable has been damaged during the install.
►
Check the ohm value shown on the cable tag as soon as you receive the cable. Write the value in the space provided on the warranty card.
►
Measure the ohm reading of the cable and record the results in the space provided on the warranty card.
►
Lay the cable out and secure it so that it is ready to be embedded (under concrete, asphalt or pavers) and then measure the cable’s ohm reading. Record this value in the space provided on the warranty card.
►
Apply the top layer (concrete, asphalt or pavers) and measure the ohm reading. Record the results in the space provided on the warranty card.
Cable Installation Tips
►
Always maintain proper cable spacing. (Cables should be spaced no less than 2 inches apart (center-to-center) and no more than 4 inches, center to center. Minimum spacing is 2 inches. Maximum cable spacing is 4 inches.)
►
Never allow the cables to cross or touch each other. (Keep a cable spacing of at least 2 inches.)
►
Never cut the heating cable.
►
In concrete and asphalt applications, the heating cable should be 2 inches from the finished surface. (The heating cable should never be resting on the ground prior to the pour.)
►
DO NOT run heating cable through an expansion joint. (Make sure the joint is tooled or cut no deeper than 1¼-inches. The cable must be ¾ to 1-inch below the bottom of the joint.)
►
Do not flex or strain the heat cable splice by pulling on the cable. Be sure to embed all of the cable, including the entire splice and 6-inches of cold lead.
►
Do not kink or bend the cable sharply. Doing so can cause the insulation to “bubble” and pull away from the cable.
►
When installing under pavers, make certain that there is ½-inch of compacted paver sand or stone dust on top of the heating cables or mats. (Cables must be completely encased with no air gaps.)
Installation Training
Knowing that a radiant heating system is only as good as its installation, ProLine offers free installation training, conveniently available online as well as in person at our corporate headquarters. ProLine also provides free training at rep locations throughout the country. Special training sessions may also be set up at your convenience. Our personal instructors will cover all the necessary topics and answer any questions you may have to give you the knowledge and confidence necessary to install interior and exterior radiant heat systems. These courses will help you gain the confidence you need to install radiant heated driveways, heated floors and roof deicing systems.
Contact ProLine to learn more about our products and installation support, free training, and professional design and layout services.
Tips for Proper Installation of Heated Driveways and Walks
A radiant heated driveway is only as good as its installation, which is why it’s important to carefully follow best practices when installing radiant heat. Follow a few simple tips and your snow melting system will be up and running in no time, working as it was designed to do.
For starters, before you lay down a foot of heat cable, it’s important to make sure you have the right products for your installation. Prior to any installation, check the voltage and the wattage of the heating cable (typically indicated on the box). If you’re unsure, you can always contact ProLine Radiant for confirmation and/or recommendations. We offer free installation support to help ensure that the installation process goes smoothly and properly.
Laying out the heating cable (mats) for a heated driveway installation.
A key practice to ensure the successful installation of a radiant snow melting system is to use a megohmmeter to perform OHM tests of the heat cable before removal from the box, during, and after the installation. This allows you to discover any potential problems as early as possible, saving you time and headaches, as well as ensure successful installation. Always document the results to maintain the manufacturer’s warranty.
Here are a few rules to remember as you begin the installation of your system:
●
Never cut, cross or overlap the heating cable. Heat cable should not be altered under any circumstances, as it may cause overheating, resulting in damage to the cable.
●
Always embed the cable completely. Leave no air around the cable.
●
Make sure to embed the factory splice (where the heating cable and power lead meet).
●
Using a megohmmeter, perform OHM tests of the heat cable before removing the cable from the box, during the installation, and after the cable has been laid out.
●
Always run the cold lead in conduit (power lead for the heating cable) – it is not direct burial.
For asphalt applications, snow melting cables are normally covered by two inches of asphalt. To prevent heat damage, the asphalt should be allowed to cool to 220°F (105°C) before pouring directly onto the mats or cables. Ground sensors/tubes should not be exposed to temperatures above 176°F (80°C).
And, for a proper sensor installation, both ground and aerial activation devices require a clear, 360-degree “view” of the sky to allow snow to fall onto the sensor plate. If drifting is an issue where the snowmelt system is being installed, it’s best to install a ground sensor.
Of course, you should always read the Installation Manual and follow instructions. You can always call ProLine Radiant at 866.676.9276 or visit us online for more information or installation support. At ProLine, we work with contractors and professional builders to provide customers with the best custom snow melting system solution at the best price possible.
Options and Tips for Installing Asphalt Heated Driveways
When it comes to installing a radiant heated driveway, installing a system in asphalt is one of the easiest applications available. The systems are not only easy to install in asphalt, but provide stellar performance, making asphalt heated driveways a popular choice among homeowners and business owners. Asphalt radiant heated driveways feature energy efficient, maintenance-free operation that enhances safety by keeping driveways clear of snow and ice 24/7. And radiant heat can be easily installed in new construction, asphalt refresh or even in existing driveways. Asphalt driveways offer great flexibility when it comes to adding or installing a radiant snow melting system. So regardless where you are in your plans, there’s still time to include a radiant heated asphalt driveway.
Asphalt and radiant snow melting systems go together for several reasons. They are both durable, and engineered to withstand extreme temperatures. They also adapt easily to the environment. Asphalt pavements flex and “give” with significant settlements of frost heave, while ProLine automated snow melting systems respond to the weather, operating only when conditions indicate that snow is on the way.
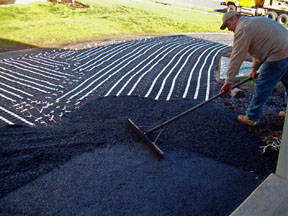
Retrofitting an asphalt driveway with radiant heat.
ProLine heat cable is specifically designed to withstand the hot temperatures of new asphalt construction jobs. And in keeping with ProLine’s commitment to always offer the latest technology and the best, most proven products, ProLine has taken its industry leading cable and added even more outstanding performance features. We listened to the comments and suggestions we received from you and other construction professionals during our FREE installation training courses to make your requests and made them a reality. This means our industry leading snow melting cable has now been enhanced to offer even more robust features, including the ability to install in much hotter asphalt temperatures, easier installation during cold weather conditions, an even tougher outer sheath and much more. Contact a ProLine representative to learn more about these latest advancements.
You see, at ProLine we are never content to be among the leaders. We might not achieve perfection, but we’ll never stop trying. We work tirelessly to research, test and develop the absolute best products possible to ensure that your business succeeds. And we can’t do that without your feedback and working closely with you during the installation process.
To install radiant heat in a new asphalt driveway, the cable is laid out on the binder or base coat and then hand shovel approximately 2-inches of asphalt directly over the cable. The asphalt is then compacted, using a 1-ton roller or less. Installing a heated asphalt driveway is relatively quick and easy. But remember, a snow melting system is only as good as its installation, so be sure to follow instructions and best practices, and don’t hesitate to take advantage of ProLine’s free installation support services. The fully automated heated driveway (or sidewalk) will provide a discreet, reliable and maintenance free operation to keep your walks and driveway snow and ice free.
If you’ve already got an asphalt driveway, but it’s in sore need of repair, placing an overlay on the existing surface can be easily accomplished. As with the new pour, ProLine snow melting cable can be installed just before the overlay. After a quick patch, apply asphalt as described above and compact. NOTE: Be sure to have a qualified electrician perform the electrical work. And follow the instructions in in the manual so ensure you keep your warranty valid.
Existing asphalt driveways can also be retrofitted with radiant heat. Using saw-cut technology, grooves are cut into the existing asphalt, and the heat cable is then placed in the freshly cut grooves. An epoxy topcoat is then applied as a sealant over the newly embedded cable. For additional traction and safety, a sand broadcast can be applied to the surface before the epoxy.
Fitted with a ProLine snow melting systems in asphalt provide a cost-effective option for your home, and will last for years with virtually no maintenance. Just think of the money you’ll save on snow removal services, snow melting chemicals and gas for your snow blower. And of course, there’s the gift of time. While your neighbors are out shoveling, snow blowing or tapping their watches waiting on their snow removal service, you’ll be in your car and on your way.
To learn more about the about the benefits of a radiant heated asphalt driveway or many radiant heat options available; or to receive a free quote, call ProLine Radiant today, at 866.676.9276.