The Advantages of Selling ProLine Radiant Heat and Snow Melting Systems

If the steady snowfall we’ve experienced this season is any indication of future winter events, it’s a great time to offer radiant heat solutions to your customers. Radiant heat is a growing trend among home and business owners for top-down heating and snow removal solutions. Efficient, environmentally friendly and very versatile, ProLine residential and commercial radiant heat systems offer you the chance to expand your offerings and win repeat business.

What makes this trend in heating so attractive to home and business owners alike? As you might expect, radiant heat works exactly as it sounds—it radiates through surfaces (think sidewalks, driveways and wood floors) to warm a specific area of a residence or commercial property quickly and efficiently. ProLine offers several choices for radiant heat systems; the two most common being:

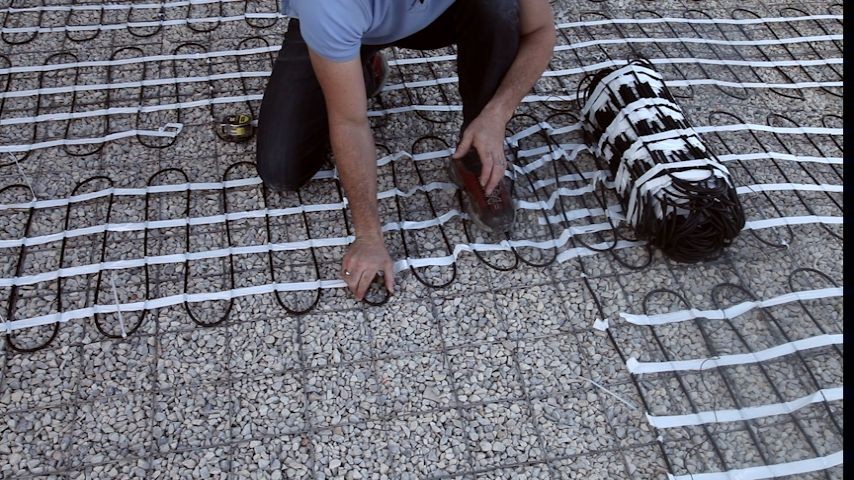
  • Electric radiant heat—uses electric heat cable configured beneath a floor or driveway to warm it up
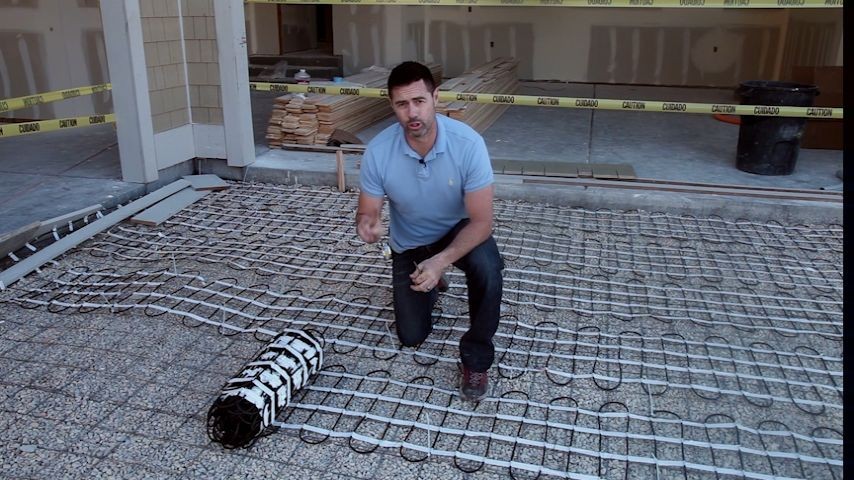
  • Hydronic radiant heat—relies on hot water delivered through a network of pipes underneath an indoor or outdoor surface to heat it

ProLine radiant heat solutions are designed to deliver consistent, even heat and can be easily configured according to client-specific preferences. Indoors, radiant heat generates a feeling comparable to the warm, enveloping heat of a stove or fireplace. These systems depend largely on heat transfer from one object to another, eliminating the draftiness and duct loss associated with traditional forced air, making them much more efficient.

A switch from forced air to radiant heat also improves air quality within a home, eliminating the constant blowing and belching of air ridden with dirt, dust and allergens that can compromise indoor environments. These clean systems are also very green options in more ways than one. Thermostats can be programmed heat to heat an entire home, or timed to heat specific areas, from kitchen, to living room and bedroom, conserving energy for pennies on the dollar. They’re also flexible enough to install under a variety of surfaces, including wood, laminate, tile and carpet.

Heated pavers outdoor mall

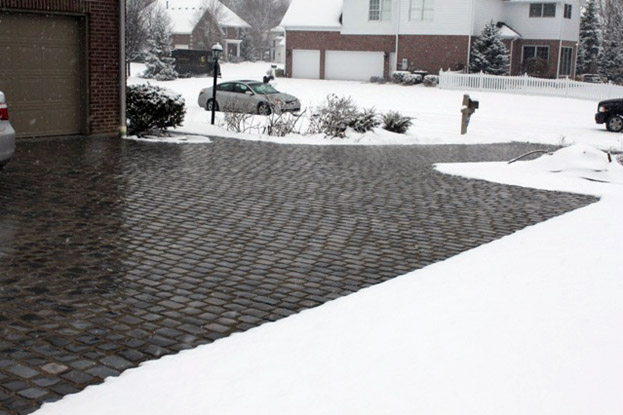
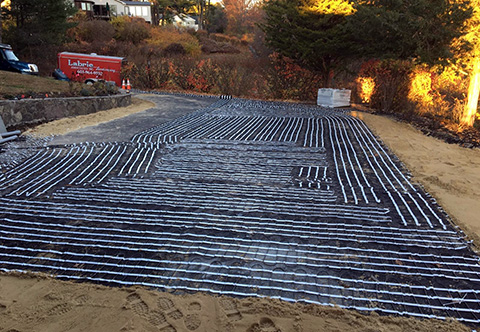
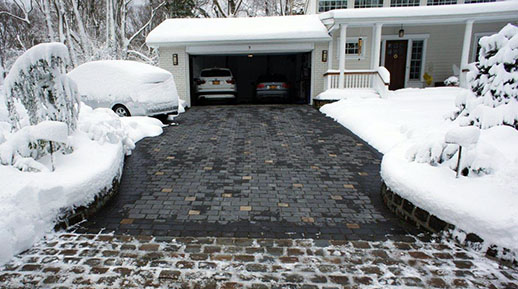
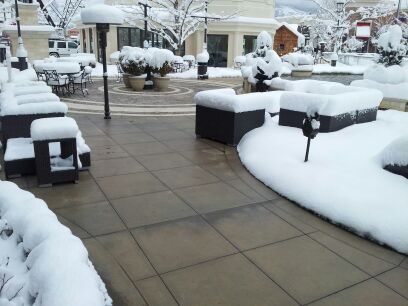
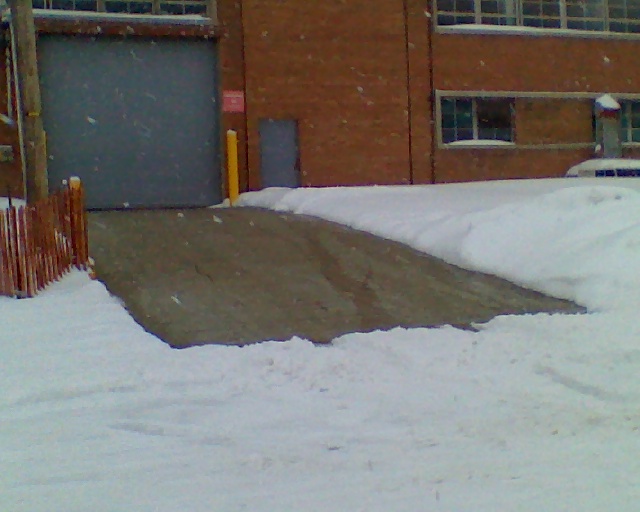
Of course this same science works wonders outside to keep snow and ice away from residences and commercial properties. ProLine offers several easily-configurable options, from electric cable right off the spool, to preconfigured mats or RauPanels (hydronic systems), depending on client preferences and overall needs. Electric cable, for example, is great for smaller, hard to reach or unusually shaped areas, while the demands of a larger commercial footprint may be better served with hydronics because of the possibility of lower operating costs. Either way, these applications mitigate risk by keeping pavement clear and dry, before snow and ice can accumulate. And they’re equally effective under brick pavers and stone as well as concrete and asphalt pours or overlays.

Fortunately, whatever client demands come your way, ProLine offers radiant heat professionals on-demand installation services, and an extensive inventory of products to match every job. We can walk you through a project from conception to completion. When you do business with ProLine, you’ll appreciate not only access to the pros, but free installation training and our vast library of materials, including articles and schematics to help you along the way. To learn more about ProLine products and services, including how to become a preferred ProLine professional, please contact us at 1-866-676-9276.

Snow Melting System Pre-installation Checklist

What NOT to do When Installing Radiant Heat – Tips and Advice from the Pros

Radiant heat is a proven technology that produces impressive results. But like most products, if the system components aren’t installed correctly, the radiant heat system can’t perform as intended, and the customer is left frustrated and disappointed. Despite the advanced technology involved, installing a radiant heat system is not difficult, but there are some key guidelines to follow to ensure that the system performs as intended. While consumers can buy the best snow melting system components from ProLine Radiant, unless they’re installed correctly the system won’t produce the results you’re expecting.

ProLine is a proven and trusted wholesale radiant heat provider offering snow melting, roof deicing, pipe trace and floor heating solutions. But ProLine isn’t content to simply carry the industry’s premier radiant heat products. ProLine has broken away from the pack by offering and following through with the best customer service in the industry.

ProLine Radiant has built its success upon the industry’s most preeminent customer services. Because proper installation of radiant heat systems is vital, ProLine not only includes installation support services, but offers free installation training courses. Installers can attend via WebX or in person at ProLine’s headquarters. Complete system layout and design AutoCADs with specs are also available, so customers will know proper layout and materials, load calculations, breaker sizes, number of breakers, and other technical aspects of the installation prior to any heat cable being installed. It’s this attention to quality customer service that distinguishes ProLine from the competition, and helps to ensure that each system installed performs as intended.

Heated paver driveway and parking area.

In addition to the personal service and support, ProLine continually posts information and tips for installing radiant heat systems. Top quality products are only part of the complete radiant heat solution. “Our product line has proven itself,” stated Brandon Weaver, Director of National Sales for ProLine. “But it’s vital that installers follow a few simple guidelines to install these systems correctly, so that customers can enjoy the full benefit of our premier products. It’s helpful to read the information we post online, and never hesitate to call our tech support team if you have questions during the installation.”

Some of the most common installation mistakes include:

  1. IMPROPER CABLE SPACING. Take the time necessary to layout and then inspect the heat cable to ensure that it’s spaced properly. Follow the basic cable spacing rules: Keep the cable at a minimum spacing of 2 inches and a maximum of 4 inches (center-to-center).
  2. IMPROPER CABLE DEPTH. Don’t let the heat cable rest on the ground before a concrete pour. Use Mesh-Ups to elevate the cable so that it remains in the center of the slab with the remesh. (Mesh-Ups are plastic support ‘chairs’ that are valuable, yet extremely affordable and they can make all the difference in the world between a successful and an unsuccessful installation.) Mesh-Ups keep the heat cable that is secured to the remesh elevated from resting on the ground as the concrete is poured. It’s a simple, affordable solution to keep the heat cable at the ideal distance from the concrete’s surface, thereby resulting in optimum snow melting performance.
  3. NEGLECTED WARRANTY CARD. Too many installers neglect to fill out the warranty card and mail it to the manufacturer. Don’t let this happen.
  4. FORGETTING TO TEST THE CABLE. Do not forget to test the cable during all phases of the installation. Start by testing the cable out of the box and then throughout each aspect of the installation.
  5. COMPROMISED HEAT CABLE. Never cut or damage the heat cable. If you must use steel rakes and shovels, take extreme caution when using these tools during the concrete pour to avoid damaging the heat cable.

One way to limit mistakes during an installation is not only to avoid the above errors, but to follow the handy checklist below:

Pre-installation Checklist

Before buying and installing a radiant heat system, review the checklist below.

  • Verify the correct voltage of the home or business where the system is being installed (220/240 or 110/120).
  • Verify the available amperage. Do not guess or assume. Because of the importance of this information, we recommend having an electrician come to your location to measure the amperage.
  • Hire a trusted electrician, preferably one you’ve worked with before. Let’s face it, not everyone is competent or ethical, so find one who has been in business for several years. Ask around and talk with those who have personal experience with electricians.
  • Keep in mind that the National Electric Code (NEC) requires that the system has 30mA GFEP (30mA trip protection).

After installing your radiant heat system, fill out and mail your warranty card.

Perhaps the most overlooked tip – and one that can eliminate installation mistakes and unhappy customers – is to take advantage of the free training! Call 801.948.7577 or 866.676.9276 to sign up or learn more.

Installation Tips – Installing a Heated Paver Driveway

Installing a Snowmelt System under Pavers

Always check the element resistance and the insulation resistance of the heating cable upon receipt and during the installation:

  1. Upon receipt: Test the cables out of the box and write the values on the warranty card.
  2. Test the cables after laying them out over the area to be heated. Write the values on the warranty card.
  3. Test the cables after the embedment. Write the values on the warranty card.
  4. Record your readings in the installation manual.

Heating cable installed for heated paver driveway

Prior to laying out the heat cable, lay down thin wire mesh over the area to be heated. The wire mesh should be secured to the ground (with landscaping staples or pins) so it will not move during the embedment process. The mesh is used to secure the cable and help ensure proper cable spacing.

Begin the cable installation as close as possible to the contactor panel / electrical source.

Roll out the heating cable or mat and secure it to the wire mesh or grid using plastic zip ties. Heating cables should be securely fastened so they do not move or shift while applying the paver sand and pavers.

DO NOT cut or alter the heating cable. The white binding tape of the heating mats may be cut in order to make turns with the mats, but the heat cable must never be cut or altered.

Maintain proper cable spacing
Heating cable being properly spaced and secured to remesh prior to a concrete pour.

When laying out the cable, DO NOT allow the heating cables to touch, cross, overlap or get bunched up. The cable must maintain a minimum spacing of 2 inches and a maximum of 4 inches.

The minimum spacing for the heating cable is no less than 2-inches center-to-center and no more than 4-inches center-to-center. Make sure cable from adjacent mats also follows the proper spacing guidelines. After securing the heat cable, double check the spacing one last time before adding the top surface of paver sand or dust.

Check with the paver or block manufacturer to determine the proper depth of sand or dust needed for ideal paver installation.

Embed all of the heating cable and the splice in a minimum of 1-inch (½-inch above and ½-inch below) of compacted material such as paver dust or sand. (This may vary depending on the pavers used. Make sure you follow the manufacturer’s guidelines for proper embedment depth.) The cable and splice to the cold lead must be completely embedded. Make sure there are no air gaps around the cable or splice. IMPORTANT NOTE: The gauge of the paver sand, stone dust or base material must be fine enough to completely encapsulate the cable.

Be careful handling the pavers after the cable is laid out. Do NOT drop a brick or stone paver directly on the cable. This can damage the insulation and cause the cable to fail. If a paver is dropped onto a cable, immediately stop the installation and check the integrity of the cable with an ohm reading.

Handle the heating cables carefully. Exercise caution when using tools such as shovels, rakes and wheel barrels so that you do not damage the cables.

Consistently verify the cable integrity by checking the resistance during various stages of the installation.

Heated paver driveway

It is important that this equipment be installed by a licensed and qualified electrician and in accordance with local laws, codes, regulation and in accordance with NEC guidelines.

If installing in permeable pavers or with pavers or blocks greater than 3-inches thick, contact ProLine BEFORE installing.

* This list is intended as a general quick reference guide. It is NOT a substitution for proper training and following the installation manual. Always read and follow the installation manual. Web-based training is available on request.

For more information about installing heated driveways and paver snowmelt systems, visit ProLine’s installation videos web page, or call a ProLine representative today at 866.676.9276.

ProLine’s 12-step Program for Contractors Addicted to the Status Quo

Don’t get Mired in the Tar Pit of Stagnant Business

Because We Care

STEP 1: Mark Twain once said, “Denial ain’t just a river in Egypt.”  Avoid the waters of “denial” and recognize that there may be a problem in maintaining the status quo. Acknowledge the positive that can be achieved by changing simple behaviors to increase your earning potential. Accept that there may be additional options available for you to achieve your financial goals. Stop denying yourself opportunities for growth.

STEP 2: Forgive yourself and let go of missed business opportunities. Understand that you are not a bad construction professional. Look to the future with optimism.

STEP 3: Accept radiant heat into your life and bask in its warmth. Envision the benefits―such as increased profits―of snow melting system installations.

Heated paver walkway at outdoor mall.

STEP 4: Recognize that you can enhance your services and build your business without investing additional capital.

STEP 5: Commit yourself to include a snow melting option on all of your future bids.

STEP 6: Understand that you are not alone and that professionals are on hand to support you. Take the unnecessary weight off your shoulders by accepting that you don’t have to be a snow melting system expert. Be positive and embrace the peace of mind that comes from knowing there are radiant heat professionals who are eager to assist you and provide you with all the tools you need to succeed.

STEP 7: Accept new friends and envision the potential benefits of offering radiant heat. Picture a future of sustained growth alongside a dedicated team of professionals who work with you to assist with all the aspects of a snowmelt system installation and ensure your success. You will be empowered by a wealth of resources to install heated driveways, heated floors, roof deicing systems and more. Rest assured that ProLine will work tirelessly with you and take care of the legwork associated with radiant heat installations.

STEP 8: Believe in yourself. Build confidence by consulting freely with snow melting system professionals and completing the free installation training with ProLine Radiant. Use the tools available to boost your confidence and gain faith in your abilities.

STEP 9: Thoughtfully watch the informative “how-to” videos online, and ponder the greater good that can result from gaining wisdom over your competitors.

STEP 10: Understand that your competitors are not evil – just ignorant. Focus on your own brilliance rather than the demise of the competition.

STEP 11: Always seek enlightenment through ProLine’s free services, including consulting, quotes, system design, installation training, and technical support. Use the resources that are available to you.

STEP 12: Share the enlightening message of the 12 Steps with your employees/coworkers and encourage them take the free training courses to ensure a brighter future for you and your company.

Remember, the road to success is always under construction, but finding ways to keep moving forward is the key. This not only keeps you from being run over, but elevates you over your competition. And remember, the professionals at ProLine stand ready and eager to help you succeed – because we care.

The Many Responsibilities of General Contractors

Helping to Ease the Load for General Contractors

The duties and responsibilities of a general contractor (GC) are enormous, to say the least. The necessary expertise includes reviewing and producing project-specific documents and architectural drawings as well as hands-on construction and project management skills. The GC is responsible for all aspects of a construction project and coordinates all the facets of a wide range of commercial and residential construction projects.

Radiant snow melting system installed in a loading ramp

After reviewing upcoming projects, the GC begins the complex process of preparing the proposal and other necessary documents for the client while determining the material needs and hiring the appropriate subcontractors to successfully complete specialized aspects of the project in the time frame provided.

The success of the contractor’s business is dependent on acquiring the building materials that best meet the quality demands and client’s budget criteria as well as hiring competent subcontractors who have proven to deliver quality work in a timely manner. It is the general contractor who is ultimately responsible for every aspect of a construction project, so teaming up with the right material suppliers and subcontractors is vital to the success of the project, the satisfaction of the customer, and reputation of the contractor.

Finding the right suppliers and subcontractors can be a time consuming venture, so most contractors stick to using those whom they’ve worked with before and have proven track records. Still, the most successful contractors always keep an eye open for better prices, workmanship and turnaround.

In the construction industry, word of mouth carries a lot weight, and many contractors benefit by asking other building professionals about their experiences with suppliers or subcontractors. Looking for ways to continually improve one’s business is the hallmark of successful companies. In today’s competitive market, the businesses that survive – and flourish – are those that explore options and consistently seek to optimize efficiency or save money and time without sacrificing quality. And most builders agree that the most effective way to explore options is through word of mouth recommendations.

While most contractors utilize familiar subcontractors for the standard construction needs of a project (framing, roofing, plumbing, etc.), the “less-routine” aspects of some construction jobs require expertise in which some GCs are less familiar. For example, not all contractors are experienced with radiant heat installations, so finding a proven supplier of radiant heat products may pose some unique challenges. As simple as it may sound to find a provider of radiant heat products, the discrepancies between companies can be dramatic, and oftentimes those discrepancies are not discovered until after the contract is signed, or after installation. And who takes the heat for an installation gone wrong?  The general contractor. Fortunately however, there are some telling indicators when it comes to comparing radiant heat companies, and it is this set of indicators that contractors should familiarize themselves with. In addition to word of mouth, use these criteria when evaluating various radiant heat providers.

Installation Support Services by a Dedicated Staff of Technical Experts – Many companies tout their technical services, when in fact, if installers are fortunate enough to talk to someone for technical support during the installation process, they’re likely speaking with a salesperson and not an electrical expert or seasoned installation professional.

ProLine backs up its products with a dedicated support staff. These technical experts understand all the layout and electrical aspects of a radiant heat installation and will take the time necessary to walk you through any issues you may have during the installation.

Detailed System Design and Layout – The top radiant heat companies provide customers with comprehensive system design drawings. These professional layouts are computer assisted drawings (CADs) that should contain a detailed layout of the heat cable, cold lead and contactor panel. The document should also identify the proper layout and materials, load calculations, breaker sizes, and number of breakers. Essentially, all the technical specs and installation information should be contained in the document. When working with an industry leader, customers will understand how the automated system works and how it is expected to perform prior to any installation taking place.

Wide Selection of Products – Check the product lines to make sure that products are available from more than just one manufacturer. You want to be able to select the best solution for your specific radiant heat needs.

Making turns with heating mats

Installation Training – ProLine Radiant is one of the few – if not the only – radiant heat companies that offers several installation training courses – at no cost! To take a free course, customers can call or signup on ProLine’s website. Courses can be attended in person at ProLine Radiant’s headquarters in Utah or attend online via WebEx.

ProLine Radiant is an established radiant heat provider with a proven track record. Contact us today to learn more at 866.676.9276.

Radiant Heat Solutions